Showing posts with label Food - Cooking Asian. Show all posts

February 24, 2010

Chicken with Dong Guai Soup


I have not made any tonic soups for myself for quite some time (the last time I did was in August last year). When I was much younger, mum always make me tonic soups - of which some I like and some I really dislike (I will pinch my nose to drink it). I never really bother to ask what the soups are for. All I know is that they are good for me. If you ask me, I do believe somewhat that they do work. Traditional Chinese Mecidine (TCM) is something which amazes me when you see how the concoction does help improve your health.

Found this recipe in a book that I have. The original recipe calls for double boiling and using a black chicken. Other than that, there are 2 chinese herbs that you need, which is available at the local Asian grocery stores. I did not want to pay A$20 to buy a frozen black chicken and hence replaced it with free-range chicken drumsticks (@$5+ per kg, is easier to handle and eat. You can get a pack of 4, 560g from Woolies). Instead of double boiling (I do not have one a proper double boiler), I used my thermal cooker (a slow cooker should do the trick too) and after 3 hours, the soup was really flavoursome and I drink a big pot of it! I did not need to add salt, which was optional anyway.

This soup is very nutritious for women. Drink it 1 to 2 times per month. It was quite effortless for me to prepare - boil water, measure out the herbs and put everything in the thermal cooker. It is ideal to drink this soup just before you sleep. I had a big bowl before I sleep last night and gladly had the rest (with the chicken) for my lunch today.

500g black chicken (I used 4 free-range chicken drumsticks)
20g Chinese Angelica, aka 'dong guai' or 'dang gui'
20g Astragalus propinquus, aka 'puk kay' or 'bei qi'
600ml or 3 cups of boiling water
salt to taste (optional)

Place chicken and herbs in a double broiler and cook it for 3 hours. Add some salt to taste.

If you want to use a thermal cooker like me, place all the ingredients into the pot in the cooker and bring it to the boil. In this case, start off with another 1/2 cup of boiling water as some will evaporate when it boils. Give it a stir and if the boiling still continues, that is when you remove the pot from heat and place the pot into the thermal cooker. Let it cook for 3 hours.

If you use a slow cooker, bring the soup to the boil as above but using a normal soup pot that you have. When it is ready (as above), pour the soup into the slow cooker and set it on "high". After 30 mins, you may turn it down to "low" and let it cook for another 2.5-3 hours.

Try it! It is so easy that I will definitely be making more of this for myself more often.

February 3, 2010

Braised Soy Sauce Pork Belly (Tau Yew Bak)


We now own a thermal pot (aka magic cooker), a kind and generous gift from S because I helped her buy siliconware from Oz. I thought I will try out making this braised pork belly again. With about 10 mins of preparation, I cooked this on the stove with the inner pot of the thermal cooker. Overall, I probably cooked this for 15-20 mins on the stove and I just chucked it into the thermal pot and went to work. By the evening (more than 8 hours later), the pot was still rather warm. I added some salt, hard-boiled eggs and reboiled the pork mixture again. The result was good but not salty enough (which I was ok with). I think I have also added a little too much water...


I tried this recipe but may try this other one the next time.

January 5, 2010

Stir-Fry Chicken with Veggies and Cashew Nuts


It is the first work 'normal' week of 2010. I thought I will try coming up with a chicken dish with veggies that I have in my fridge.

The result was quite good. I ate quite a bit of it even though I only had a little rice. I know that hubby likes the dish when he goes for seconds on the rice. He does not like to eat the dish by itself. He likes it with rice, especially those with lots of gravy.

Here is my 'agah agah' recipe (ie. ingredients proportions are via estimation):
1 piece of chicken breast (~300-400g), diced (use chicken thigh if you prefer)
1/2 big green capsicum or a small one, sliced
1 角瓜* (aka angled luffa), peeled and sliced
5 button mushrooms, sliced
2 tbsp corn flour
2 tsp rice wine
2 tsp soy sauce
200ml chicken stock (if you don't have, water is good)
1 tsp salt
1 tsp sugar
2 garlic cloves, finely chopped
2 tbsp vegetable oil
1 tsp white wine vinegar (or normal vinegar)
Cashew nuts

Marinade diced chicken in soy sauce, rice wine and corn flour for 10 mins. Place oil in fry pan/wok under high heat. When it is heated, add chicken. Cook until chicken turns slightly brown. Dish out the chicken and put aside.

Add more oil into the fry pan if required. Add garlic and stir for 30 secs. Add capsicum, mushroom and stock and cook for 1 minute. Add luffa and the browned chicken pieces. Cook for anoter 2-3 mins until the chicken is completely cooked. Add vinegar, salt and sugar and mix well. Sprinkle over cashew nuts (as much as you like) and serve with rice.

I did not cook cashew nuts together because I like the crunch texture and the nuts I have come toasted and salted when I bought them.

*My MIL grows 角瓜 and she calls them by that name. The Cantonese call it "xi kua". Few people know what is the English name. Only when I googled and I found out that it should be angled luffa or chinese okra. I love this - soft and juicy :)

November 11, 2009

Peranakan Delights


Borrowed this cookbook from the library. Hubby and I have been craving for peranakan food since we watch the Singaporean drama a year ago "The Little Nyonya". Unknown to many, the school that I attended for 10 years had peranakan roots too. It was set up to educate chinese girls academically and to equip young girls for their future roles in life as wives and mothers. Hmm, hasn't it achieve that purpose in me? ;p

Well I am NOT a peranakan but I do like its food - rich in taste, spices. Those who can really cook peranakan really cooks very well. I kind of regretted not learning now. But here is my chance! With this cookbook (of which I have copied down some recipes), I hope to add these peranakan dishes into my repertoire. You will know if I succeed if I blog about it ;)

October 17, 2009

Singapore Curry

I did not know that there is such thing as Singapore Curry. Singapore has many sorts of curry - indian, malay, chinese, sri lankan, etc.

Can't remember if this was what I bought from Singapore or perhaps my folks brought it here for me. Anyway it was a good thing to try...


Turned out to be really good! Hubby and our boarder TY loved it! Just add chicken pieces and potatoes. I reckon that the coconut milk gave it the final punch. And yeah I suppose it is rather authentic of the curry that you can eat at the Singapore hawker stalls. The portion was enough for our dinner, hubby's lunch the next day, a portion for another meal (to freeze) and a container of the gravy (to freeze) only, which can be used for curry noodles, etc.

This has certainly made us closer to buying more Prima Taste when we go back to SG. Can't wait!!

September 30, 2009

Prima Deli (Taste) Delights

One of the ways to cook your own authentic SG food in Oz is to use ready-to-use mixes. Even though this is 'cheating', not cooking from scratch using raw ingredients, the convenience of using premixes is really enticing... especially when the end result is very satisfying and authentic and 'shiok'!

I was checking out Prima Taste to see what premixes are available and which ones are available in party packs (cook in bulk). I was amazed to see that other than laksa and chicken rice, they have a lot more others! Why didn't I know this earlier so that I could bring them back from SG?? Check out the prices... they are really good value too!

Of their mixes, I have tried bak kut teh, beef rendang, chicken rice, laksa and chilli crab. They are all really authentic... which makes me not really miss those food at all :p If you purchase these mixes on their online store, you apparently get free shipping to anywhere in Singapore for purchases above S$30.

In the meantime, it cost a bit more to buy in Australia, given the current currency exchange rate. However if we were to bring it back from Singapore, they might be rejected by the customs... But thank God, so far, I manage to get through all that I have brought over.

Party packs are available at Prima Taste Kitchen, The Centrepoint Shopping Centre. They are great for hosting parties of at least 10 people. That means I can have a party with Singaporean friends here over authentic Singapore food :)

Places in Brisbane where you can find Prima Taste mixes:
  • Amigas, Wynnum North
  • Burlinton Supermarket, Fortitude Valley
  • Flavour of Asia, Capabala
  • High Fresh, Sunnybank
  • Hung's Supermarket, Sunnybank Hills
  • Vui's Market, Inala
  • Welcome Fresh Foods, Sunnybank
  • Welcome Mart @ Robertson
  • Yuen's Market, Sunnybank
  • Yummy Chow, Morayfield
(See the list of places in the world where you can find Prima Taste mixes)

September 29, 2009

Hainanese Chicken Rice

Chicken of Hainanese chicken rice. This dinner was accompanied by boiled veggies and mushroom omelette

My grandparents were born in Hainan (pronounced as 'hi naan') Island, a small island south of the main part of China. When the people from the Hainan island (Hainanese) arrived in Singapore/Malaysia, they made "Hainanese chicken rice" and hence its name. Even though it has its origins from Hainan island, it is popularly known as a Singaporean dish :)

I have attempted making this a couple of times (only in the past 2 years), from the most tedious methods, to the shortcut ways of making this dish. If you were to make this from scratch, it does take quite a bit of time, effort and ingredients. If you are interested, the recipe can be found here - from marinating the chicken, cooking the chicken, cooking the rice and making the chilli.

However, if you are short of time or getting lazy (like me :p), this is my shortcut method (this still takes about 1.5 hours for prep and cooking):

Chicken:
1 whole chicken (I usually buy corn-fed or free range chicken when they are on sale)
1 tsp salt
1 tbsp light soya sauce
1 tsp rice wine
2 pcs of 1-inch thick ginger, lightly bruised
1 garlic clove, peeled and lightly bruised
a small bunch of spring onion
1 tsp sesame oil

Prepare the chicken by removing extra fat (save this fat for the rice if you want to follow the long method of cooking the rice. Otherwise, throw it away). Rub the chicken and its cavity with salt. Then rub with rice wine and 1/2 tbsp soya sauce. Stuff the cavity with garlic, ginger and spring onion. Set aside for 1 hour (not in the fridge).

In a stockpot with sufficient water to cover the chicken, bring the water to boil. Lower the chicken into the pot and ensure that it is entirely immersed. Turn off heat immediately, cover the pot and allow to stand for 1 hour. At 15-min intervals, lift the chicken and drain water from the cavity so that the chicken will cook through. At the 30th min mark, reheat the water to almost boiling point then turn off the heat. Never allow the water to boil. At the end of the hour, remove the chicken and immediately put it into a large bowl with ice and water to arrest further cooking.

Once the chicken is cooled (about 15-20 mins), drain it thoroughly. Rub it down with 1/2 tbsp soya sauce and sesame oil. Set chicken aside, covered, until it is ready to serve. To serve, chop the chicken into bite-sized pieces. Place on a serving platter over sliced cucumbers/tomatoes. Garnish with coriander sprigs.

Rice:
1 jar of Hainanese chicken rice mix (available at Asian grocery store. Use either Lee Kum Kee or Wor Hup brand)
4 cups of rice (or however much you want to cook)

Wash the rice. Cook the rice in the rice cooker according to the instructions on the chicken rice mix. If you are able to, add a piece of pandan leaf (tied into a knot) for extra flavour.

Serve rice with chicken pieces and with special chicken rice dark soya sauce (or just the normal one will do), Lee Kum Kee chicken rice chilli (in a jar, available at Asian grocery stores).

As for the chicken stock left behind from cooking chicken, you may bring it up to a boil and add carrots or other veggies. Cook the veggies and serve them with soup with the chicken rice. Alternatively, most of the time, I will reserve the stock (freeze them if you are not using it within the next few days) and store them into containers. I like to use the stock to make rice porridge or cook instant noodles as a soup base for extra flavour. Never NEVER throw this precious stock away!

Using the chicken rice mix means that I need not wait for the chicken to be cooked and use the stock to cook the rice. I save on the time and effort to fry the uncooked rice with chicken fat, ginger and garlic. The mix has oil, ginger, garlic, etc in it that will fragrant the rice. You usually require quite an amount of chicken fat to make the rice fragrant and tasty. Otherwise, the flavour is just not there...

If you would like it easier, pop down to your nearest Asian grocery store and buy the Prima Deli Hainanese chicken rice mix that comes in a box with the full works - mix for the rice, mix for cooking chicken, authentic dark soya sauce, chilli and ginger sauce. All you really need is chicken, rice and water!

Enjoy! :)

August 25, 2009

Free Range Chicken Soup with Korean Ginseng


When my mum last visited me, she brought over some Korean red ginseng extract for me and I was supposed to take it every so often (which I have not :p). Finally remembered and got around to make some chicken soup which I will be able to add some of this extract into the soup for extra *healthy* goodness.

100% pure Korean red ginseng and extract - gold, from ginseng roots. The stainless steel teaspoon comes with it!

Using my tall claypot, I put in a free range whole chicken and some corn and enough water to cover them. I have also randomly added some Chinese herbs to the soup - red dates, ginseng, wild yam, lily bulbs and wolfberries and also a few slices of ginger. To season it, I added soya sauce and salt. This was cooked by bringing up to the boil and simmering over low heat for about 2 hours altogether. 1 teaspoon of the extract is added about half way through.


Herbs - (left, clockwise) red dates, wild yam, wolfberries, lily bulbs, ginseng

My reliable tanyu claypot :)

I was quite pleased with the result, given that this was just my own 'trial-and-error' recipe. Unfortunately, hubby was not quite used to the taste... I suppose, unlike me, he did not grew up drinking Chinese herbal drinks and tonics. I had the left-overs for lunch today and it tasted even better!

August 4, 2009

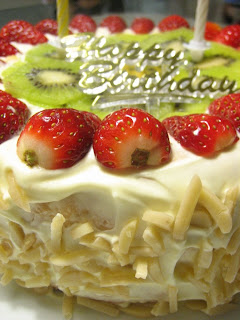
Hubby's Birthday Cake & Family Dinner

Last Friday, the family came together to celebrate hubby's and my FIL's birthdays. Their birthdays are only 2 days apart from each other (although technically speaking, my FIL's birthday is not today but another day... but that is another story).

My FIL has gout and he chooses not to indulge in rich foods. Hubby is not big on sweets, chocolate, coffee nor any alcohol. Hence I began searching for the recipe of a cake that I have not made before... I suddenly remembered that I have some pistachios in my freezer... and I found an orange pistachio cake on Taste. Along with some other cake ideas I have, hub got to choose and he chose this orange pistachio cake. I thought I will add a crumble to it and also make some candied oranges to go with it. BUT all that was reduced to a dream when my cake mix spilled all over the oven door and the floor. I was so devastated! For the next hour, hubby patiently and lovingly cleaned up most of the mess I created (looked like someone's vomit). The oven door has to be removed to properly clean up the mess. We managed to salvage part of the cake batter (you wouldn't want to know how we did that) and went ahead to bake it after the clean up.

However after looking at the sad state of the baked cake, I figured that it is not good enough for a birthday cake. So even though I was very busy, I still made time to bake a sponge cake with fruits. That did not started well. That little bit of egg yoke in my bowl with egg whites caused the egg whites not form stiff peaks even after I had whisked it for ages. In the end, I decided to redo the entire thing and the end result turned out pretty good!


That Friday, I also made the teochew 扣肉包 'kong bak pau' to contribute to our family dinner gathering to celebrate the birthdays. With this recipe that I followed, I made 2kg worth of pork and prepping the dish 2 days ahead (the blanching and frying of the pork) and hence was marinated for 2 days instead of just a couple of hours. Hence can you imagine the really good flavours after 2 days of marinating?

It took me 3 hours in total to steam the entire lot (I steamed them over 2 batches). Even though you can see a layer of oil on top of the sauce, when I used my fingers to pick up a piece to taste, it does NOT leave behind any grease on my fingers at all! I was so surprised! The whole bulb of garlic was popular with my 2 BILs, who loves garlic. It was so soft and just melts in your mouth (having said that, I still do not like it. I almost threw the bulbs away after cooking but I remembered that at least 1 of my BIL likes garlic).


The family had our biggest feast ever, with homemade kong bak (with homemade pau), homemade 算盘子 'abacus beads' , homemade egg noddles, homemade 菜头糕 'asian carrot cake', homemade shark's fin soup, amidst some other dishes, making it on par with a 10-course wedding banquet!

And last but not least, we rounded up the dinner with the birthday cake!

July 13, 2009

Food That I Really Missed - Bak Kwa


Bak kwa - a barbequed flat piece of minced pork is one thing that I miss most... This is one food that cannot be brought across the Australian customs. I will not miss it when I go back to Singapore, even though I normally do not eat bak kwa other than the Chinese New Year season.

This tasty sweet piece of meat is very popular in Singapore and Hong Kong. Some would stand in long queues to buy the best ones before CNY. My SIL tried making some a few weeks ago with this Lily Ng's recipe. The taste was somewhat there but the texture is not perfect. Anyhow I was happy to taste something close to it :)

Bak kwa is great to be eaten on its own. Other popular ways of eating - putting a slice in between 2 slices of bread or cut it up into shreds and put them into fried rice. Yum! I prefer to eat them on its own :p

Whilst hubby had some hours at Singapore airport in transit to come back to Brissy, I asked him to buy a couple of pieces and eat them on my behalf.... I hope he remembered to do that!

April 24, 2009

Homemade Kaya (aka Coconut Jam)

My Glory kaya is running out (yes, you can find the Singapore-made Glory in the shops here!) and I thought I will attempt to make the kaya which Tez made for me last year. It was her mum's recipe which only uses microwave to cook! Looks easy but apparently you may not get it right the first time. I think my attempt is quite about the same as what Tez gave me...

Ingredients:
4 Eggs
250g caster sugar
200ml coconut milk+ 1 tsp cornflour mixed together
Pandan leaves tied in a knot
3 tbsp extra caster sugar

Microwave Method:
1. Put all ingredients except extra sugar into a covered microwaveable bowl, mixed well beforehand.
2. Microwave on medium high for 5 mins
3. Remove and whisk well till emulsified
4. Microwave 4 more minutes, stir again
5. Microwave 2 more minutes
6. Heat the extra sugar till caramelised then add to mixture, stirring well.

NB: handle with oven gloves! very hot!

I added some pandan essence as I wanted the green colour. It seems my frozen pandan leaves does not produce much green colouring as I would have thought. I reckon this recipe is not too bad for a microwave version... I put in less sugar than requested accidentally and it is not as sweet as your typical kaya... which also means it is healthier! But make sure you consume it quickly. Apparently it does not keep very well...

April 15, 2009

A Simple, Satisfying Meal

Steamed minced pork with salted egg and stir-fried carrot/cabbage (ignore the hard boiled egg in the centre)

I often get this question asked "do you cook everyday?". The answer is "I cook dinners on an average of 4 nights a week." Hubby and I would go to my in-law's place for dinner every Thursday. On the weekends, we either eat the leftovers from the week or hubby will cook us instant noodles or we might be either eating out with friends (every Sunday after church) or just eating out at friends' place to gather. I would cook extra for dinner so that hubby would have it for lunch the next day.

Another common question "do you cook mostly asian food?". The answer is I will try to vary them and will cook at least 1 'ang mo' (western) meal in a week. It may come in the form of steaks or pastas. Sometimes it becomes fusion - steak with rice and asian veggies.

For breakfasts, hubby would be happy eating cereal everyday but we actually rarely eat cereal (even though it is readily available in our pantry as a backup). We either have toasts, pikelets (I make them in a big batch to freeze away on average every month), muffin cakes (same as pikelets), or any other food that we happen to have. I try to make sure we have varied breakfasts everyday.

This brings me to the point - I am very thankful to have a husband who eats everything (if not, 99%) of what I cook, even if they may not taste great occasionally. And hubby is the type of person who eats every single grain of rice in his bowl. His lunch box always comes home much cleaner than mine. He is one of those (my mum would say to a little child) who will grow up marrying a girl with good complexion because he cleans out his plate at a meal. If you have seen me, judge for yourself if my mum is right :p

Last Wednesday, I suddenly had an idea to use the salted eggs lying in my fridge to mix with the minced pork that I have and steam it. I vaguely remembered I have eaten such a dish before, either at yum cha places in Singapore or my mum has cooked it before. I did it! Just cook the salted egg until it is a hard-boiled egg, mash it up and mix it with the raw minced pork. Add a bit of soya sauce and sesame oil and I 'steamed' it in the microwave (I was lazy to use my wok to steam :p) using my faithful Pyrex dish (I often do that to steam fish too). The next thing I did was to stir fry the leftover raw cabbage and grated carrot from our vietnamese rice roll meal over the weekend. I added fish sauce and some chicken stock powder to it. These were 2 very simple and no frills dishes... but hubby loved it a lot! He would be happy just to have them everyday (with rice, of course) - simple yet tasty. This is probably the simpliest meal I have cooked from scratch and yet it obtained much praises and satisfaction from hubby. And of course, it makes me happy that hubby is happy with my cooking too! For the record, hubby has never complained about my cooking :)

Relating to food, hubby is also the 'sacrificial' sort. Even with his favourite food, he would make sure he only eats some (not eat a lot), so that others will get enough to eat. Sometimes he would remind me to do that too (I sometimes get carried away when I eat my favourite). He would also be polite to let others eat first. When we eat out and have different food and he knows I (too like him) like the food on his plate, he would not be selfish to give me a bit more than what he would usually do, while I am usually more relectant to do it when it comes to him liking my food :p Most times, he would peel prawns for me because I am a bit more lazy to peel it (e.g. when we had steamboat last night, all the prawns I ate are peeled by him). On the day that I first met hubby a couple of years ago, E, one of my good guy friends at the same dinner table noticed that hubby would take food for me and place it on my plate for me. That left a good longlasting impression on E until now. Heh but really, I myself did not remember that :p

I am thankful for these simple joys of married life and enjoying the little bits of sacrifice hubby does for me.... :)

April 13, 2009

Vietnamese Rice Rolls (with Grilled Pork)

Had vietnamese rice rolls at friends' place a couple of times but I have never tried it myself before... We had L and M over for dinner last Saturday and we thought it best to have vietnamese rice rolls, the healthier and welcomed option for ladies :)

The set-up: (clockwise from bottom) prawns, carrot, cabbage, rice paper, basil and mint, grilled pork, rice vemicelli and hot water

Fish sauce and peanut sauce to dip the rolls in. Recipe compliments from F.

Fresh mint (from SIL W) and thai basil (from my garden)

Grate the carrots, cut up cabbage or lettuce into thin strips, cook up some prawns and halve them lengthwise, cook up the rice vemicelli and grill the pork strips. Prepare hot water to dip the rice paper in. Ensure that the container is big enough for the rice paper.

Grill pork
500g sliced pork
1 tbsp sugar
2 tbsp fish sauce
4 cloves of minced garlic
1 tbsp cooking oil
~ 3cm worth of lemon grass, sliced

Marinade pork with all the other ingredients for at least one hour. Grill them using a grill pan or stir fry them in a fry pan.

Fish sauce dip
1 tsp chilli paste or 3 fresh red chopped chillies
3 cloves minced garlic
1/4 cup sugar
3 tbsp fresh lime or lemon juice
1 tbsp vinegar
3 tbsp fish sauce
1/2 cup water
1/2 tsp salt

Mix everything together in a bowl and serve.

Peanut dipping sauce (hubby's favourite)
1/2 cup hoisin sauce
1/2 cup tamarind juice (optional. I didn't use it)
1/2 cup crunchy peanut butter
3 tbsp sugar
1/2 cup ground peanuts
2 tbsp minced garlic
water

Mix everything together. add enough water to obtain a paste/gravy type of texture. I used the amount of water stated in the recipe but it turned out too watery. Serve.

I don't think you need lessons on how to wrap the rice rolls right? It does not matter how you assemble it... so long as it taste good! Be prepared for each person to eat at least 4 rolls.


April 11, 2009

Dim Sim... Wantons... Siew Mai...

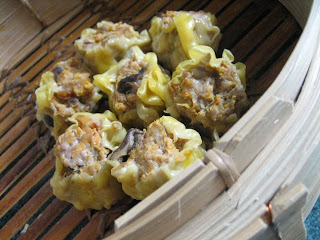
Last Saturday, my workplace organised a lunch gathering for the alumni people... Being an Asian (most others are Cacausians), I was asked to make an Asian finger food. M suggested making wanton (commonly and generally known as "dim sim" in Australia) and told me how I should wrap it so that the filling is exposed on the top, which looks like siew mai. I concocted my own recipe...

(Ingredients are roughly estimated. Makes about 70 wantons)
1kg pork mince
1 cup chinese dried mushroom, soaked to soften and sliced
1.5 cups grated carrot
1 cup finely chopped prawns
white pepper
3 tbsp soya sauce
1 tbsp shaoxing wine
2 tsp sesame oil
wanton skins (I used "egg pastry" skin, which I thought was quite good)

1) Mix pork, mushroom, carrot, prawns, pepper, soya sauce, shaoxing wine and sesame oil in a large mixing bowl. Mix them well (I used my hands because I think it gives it a better and thorough mix).

2) Cut off the corners of the wanton skins. Put about 3/4-1 tbsp of filling onto the skin. Wrap the skin to form the sides of the wanton. Shape it as in photo below. Flatten the top each wanton.

3) Steam them for about 12 minutes. Optional to serve with sweet chilli sauce.

I only managed to make 60 wantons. That was how many 1 packet of wanton skins had. I made the rest of the filling into meat balls and freezed them away for future use.

Wrapped up wantons before steaming


The finished product - steam wantons (siew mai)


November 3, 2008

Most Successful Char Siew of the Year


Hubby and I read about ieat's blog entry on Fatty Cheong's char siew and decided to try it for ourselves last Friday when the family came over for dinner to celebrate my birthday. We used collar butt pork and since we bought it the Sunday before, we thought we will marinade the meat instead of freezing the meat and then thaw it a day or 2 before Friday to marinade it. We also anticipate that the longer the meat is soaked in the sauces, the better the result will be.

Prior to this attempt, I have tried making char siew from another 2 recipes. The first was the Chinese BBQ Pork from Donna Hay. It turned out ok, good tasting, but definitely without the authentic char siew taste. My 2nd attempt just over a month ago was better and good. I didn't add any red colouring to on both occasions.


I used this "Fu Chung Beancurd" in place of bean paste in Fatty Cheong's recipe. This beancurd was used in redneck's recipe and since I specially bought it for char siew, I might as well just use this.


In there, we have about 1.4kg of pork. We had to adjust the amount of sauces estimately. Of course I had to use my 'agarism' (estimation) for this. In the end, I still had quite a bit of marinade left over... The above, strips of pork rained with white sugar and oyster sauce.


Hubby cleverly used the plastic bag that used to contain the pork as a glove to run the pork strips through the marinade ingredients.

The red colouring made it look quite gross... as if the meat was covered with blood!

There, we used the xue di zi to bake the char siew... except that I was too busy cooking and preparing other stuff that I forgot to baste it.


The result was awesome! This is really quite close to the taste authentic char siew. Although we could easily buy good chair siew from HK shops, we figured we like the idea of trying it and then see if we could reproduce for ourselves at home. I'm sure my mother will be quite proud of me. She can make good siow bak and I can make good char siew! :p Will make it a point to go down to try out the real Fatty Cheong's char siew when I am back in SG in a month's time. So then I can try out what should it taste like!

September 24, 2008

Aahhhh... The Mystery of "Xue Di Zi"

I last blogged about the turbo broiler and also about making char siew? Hubby recently read about a char siew recipe on ieat. In the article, was mentioned that you could use the conventional oven or the turbo broiler. ieat's mother-in-law calls the turbo broiler "xue di zi", which is exactly what my mum calls it too! I grew up knowing it by that Chinese name but I never wondered why and what it means. I just thought that it was the name of that cooking gadget... no until I saw the words conventional oven or turbo broiler on it one time.

So apparently it was named "xue di zi" (in chinese) because the shape of it resembles a flying guillotine. How interesting! Anyhow, the use of is "xue di zi" not common in Australia yet. If anyone is using it, that person is probably (in 99% of the time) an Asian.

Now, I shall go tell my mum why she calls the turbo broiler has that name... :)

September 4, 2008

Char Siew BBQ Pork

Last month, in my search on the internet to find out how I can make chee cheong fun sauce, I stumbled upon this blog which I found the receipe to do so. Boy, this person is a serious food recipe blogger. I reckon she is an Asian and living in NZ. I have been wanting to make char siew for some time but I have not gotten down to it. I noticed that there is a recipe on the blog so I thought I'll try it!

This Sunday is Father's Day in Australia. Australia's Mother's Day is the same as Singapore's (2nd Sunday of May) but I am not sure why the Father's Day is different. As my younger SIL is leaving for holidays this Sat and my older SIL and hubby are going away for the weekend, the Wong family celebrated Father's Day today at W&R's new place. Because it is a working day for me, I was originally spared from bringing a dish. Later I figured that I could marinade a meat dish and cook it with my turbo broiler (which is portable and I can bring it to the office) while I work. Char siew became the natural choice to make :)


Roasting with my turbo broiler (photo taken with mobile)

The original recipe calls to use pork belly but I didn't want the many layers of fat (which I will end up spitting out) and so I ended up using "collar butt" pork. Collar butt has a few streaks of fat in between which you need because of the roasting/grilling. Otherwise the meat will be too dry and tough.


End result (blurred photo using my mobile)

The char siew ended up really yum! With the left over marinade and honey glaze, I put them in a saucepan and bring it to the boil. Add cornflour to thicken the mixture. Serve the gravy with the meat :)

August 8, 2008

More Anchovies

Last month, I made some ikan bilis (fried anchovies and peanuts). Last week, I attempted it again. This time, I used peanuts with skin and added a bit more seasoning. I have also made a batch, 3x more than the previous and gave some to my SIL and PIL.

As usual, what you do is dry fry the peanuts and anchovies separately until they are nicely toasted and crispy. You can choose to put in some oil. For me, I used canola spray oil. Combine both the peanuts and anchovies in the wok and mix well. Add sugar and sweet chilli sauce and stir and cook, until it becomes sticky and the sugar has caramelised. Add enough sugar and sweet chilli to your taste.


It seems like this is a much more popular version than the dry fried ones. Everyone in my family loves it! Yum!

August 4, 2008

Chee Cheong Fun (Rolled Noodles)

CCF is one of my childhood food. Eating it reminds me of how my mum would go to the market near our place on weekends and she would buy me that for my breaky. It used to cost 50c to 70c, depending on the portion that you want. The 50c portion is good enough for me.

In Brissy, I have only eaten CCF (aka cheong fun, as the Cantonese know it) at yum cha places. Although I like cheong fun with fillings like 油条 yu tiao (fried dough fritters) or char sui (bbq roast pork) or prawns, I also miss the simplier ones with the black sweet sauce (not the red ones). I was told that I can find CCF at my local Asian grocery store (Yuen's)... I did not see it until last week!

1kg worth of chee cheong fun


After a search on google "how to make chee cheong fun sauce", the most authentic recipe that I found was this:

Chee Cheong Fun sweet sauce (from Waitakere Redneck's Kitchen)
1/2 cup water
7 tbsp hoisin sauce
1 tsp dark soy sauce
3tbsp light soy sauce

Mix everything in a saucepan. Stir the mixture and cook it in medium heat. Because mine did not really thicken, I added a bit of cornflour to thicken it.

To serve: pour the sauce lavishly onto the warmed CCF (steam or microwave it), drizzle over some sesame oil and sprinkle toasted sesame seeds on top and you are good to go!

The end product which I really really enjoyed :)


July 4, 2008

Ambitious Day At Home

Just begun a part-time work which I only work 3 days a week. I'm not working today and have been thinking of making/cooking things which I needed the time and the mood to do.

1. Dao suan (mung bean warm Asian dessert)
2. 汤圆 tang yuan (glutinous rice ball, another Asian dessert)
3. Fried ikan bilis (anchovies) and peanut
4. Pea and ham soup
5. Lemon tart

I endeavoured to make/cook all of the above today but didn't manage to because I realised that I left the cream that I bought for the lemon tart in the office yesterday (wanted to make lemon tart because I had left over egg yolks after making coconut macaroons last week) and I forgot that I needed thyme for pea and ham soup (hubby took the car to work and I couldn't go anywhere to get it). Nevertheless, I managed to make/cook 3 out of 5 food and still had the time to do other household chores, knit and watch Home Alone 4 (which happens to be on tv).

dao suan dessert

Dao suan is my favourite warm dessert. In fact, its the only warm dessert that I eat. It is cooked mung beans or shelled green beans. You can get easily buy it at any Asian grocery store. Soak the beans (preferably overnight). Steam the beans for about 15 minutes until the beans open up. Cook the beans in a pot (I used a slow cooker) with just enough water to cover the beans. Add rock sugar to your taste. When it is almost cooked, add starch (potato flour or corn flour) to thicken it. Serve with cut you tiao . You can buy them at Yuen's Grocery (in Brisbane. A pack of 4 double fritters cost A$4)

油条 you tiao - fried dough fritters (cut)

Was reminded of my liking for fried peanuts and anchovies (ikan bilis in Malay) when I ate the Indonesian version a couple of weeks ago. JQ's aunt's friend actually was able to bring a packet of it through the aussie customs. After I finished the small supply of it, I decided that I'd make something myself so that I can have that constant supply to go with my rice or porridge.

I saw a packet of anchovies at Coles (you can also get it at Asian groceries) and bought it last week. Along with a packet of blanched peanuts I bought some time back, I dry-fried both of them separately in my wok until they are toasted and then later combined both of them to continue frying with a bit of spray oil and a little bit of salt. And I am very pleased with the result, especially when this is my first try. Didn't think that it'll be that easy and non-messy. Next is to try to add sambal and sugar to make the other type of ikan bilis.

Fried anchovies and peanuts


I also bought some red bean paste in a can to go with my green tea ice cream. However there was so much left over that I wasn't sure what to do with them. The idea came to make them as stuffings to 汤圆, aka glutinous rice balls.

It is simple. Buy a pack of glutinous rice flour. Add enough water until you can knead a smooth dough. Roll out about 4cm-diameter (or whatever size you want) balls. Flatten each one into a flat round piece. Put a round ball of red bean paste into the end and close up the dough to form a ball. Smoothen out the cracks of the ball, roll it in a plate of excess flour. If possible, freeze the balls immediately. This is so that they will not absorb moisture and be too moist and sticky. When you want to eat them, take them out of the freezer and throw them into boiling water to cook. When the balls float up on the water, they are ready to be taken out of the water. I love to eat my 汤圆 with peanut soup. And I am so pleased to find the peanut soup at Yuen's. Instead of boiling the 汤圆 with plain flour, they could be boiled with peanut soup. Yum!


Balls of red bean paste


The end product - 汤圆 (glutinous rice balls)


My favorite peanut soup


This leaves me to try pea and ham soup and lemon tart another day... That was enough to keep my day busy at home!

Related Posts Plugin for WordPress, Blogger...