Showing posts with label Food - Cooking Dessert. Show all posts

January 27, 2010

Mango-misu


So "what is a mango-misu?", you may ask... You know what is a tiramisu right? A mango-misu is the mango version instead of coffee and coffee liquer. My SIL made this for my niece and other SIL's birthday last week. The recipe is taken from Delicious magazine. I am so gonna make this one day :)

500g mascarpone cheese
600ml thickened cream
1/3 cup icing sugar
1 tsp vanilla extract
1/3 cup Cointreau or Grand Marnier
juice of two oranges
300g sponge finger biscuits
3 mangoes, sliced 1cm thick

Line the base of a 22cm springform cake pan with plastic wrap or baking paper, or use a glass (Pyrex) dish as in photo.

Beat cheese, cream, sugar and vanilla in a bowl until thick and well combined.

Combine the liquer and orange juice in a separate bowl. Dip half the sponge fingers into the juice, and create a layer in the base of the cake pan/dish. Spread 1/3 of the cream mixture, top with 1/3 of mango slices and repeat the process. Top with remaining cream mixture and top with mango slices. Cover and chill overnight or for 3 hours. Enjoy!

Postscript: Tried making it today. I reckon HALF of the above ingredients is sufficient to make up an average dish/container for 6-8 people. So you may adjust your portions according to the size of container that you are using :)

December 22, 2009

Mango Jam and Sorbet

Mango jam bubbling away, ready to store in sterilised jars

We bought some good and cheap mangoes from Aldi a month ago. They were going for 69 cents each and we bought a box of them (16 in all). Other than eating some of them, I decided to make some mango sorbet and mango jam.

Mango sorbet was easy to make. However I do not have an ice cream machine and was too lazy to beat it manually. Hence they end up in the freezer as mango ice. But it was still nice. You could taste the real mango goodness, great for a hot summer day!

Mango jam was not that difficult too. Just mango pulp, sugar and some lemon juice. I made 2.5x250g jars of mango jam 3 weeks ago. Tried in on scones and pikelets so far. Hmm... I really love the real mango goodness on them!

Tonight, I shall be making some more jam, using Honey Gold mangoes (bought 6 ripe ones yesterday, 3 for A$2 and they are big ones). Hopefully there are altogether enough jam for me to bring back to Singapore to give away to family and maybe some friends.


Will jazz the jars up a bit to make them prettier to give away :)

November 28, 2009

Mango Ice Blocks

It is 3 more days to summer and it is time to make some ice blocks to quench the thirst and cool the body down. I bought some ice block container at Ikea for $3, enough to make 6 blocks. Since we bought a carton of mangoes from Aldi the other day, I thought we shall make some mango ice blocks!

It is simple - just puree the flesh of 1 mango (I was lazy and just used a fork to mash it), distribute them amongst the block containers. Top it up with mango juice (I used mango apple juice) or another fruit juice like pineapple or orange juice. Freeze! After freezing overnight, this is what you get:


Yum yum!

October 8, 2009

Flower Pot Desserts

Saw The Pioneer Woman's blog and she made this wonderful and creative dessert in flower pots. I am gonna try this one day!!

On reading a bit, I realised that she has just published her very own cookbook! I love her great photos and detailed recipe on her blog. I am certain that her cookbook will be really good... Oh, how I wish someone will give me that ;)

On another note, BHAG also has a recipe baking mud cake in flower pots. I reckon this is worth a try too! Watch video here.

September 24, 2009

Chocolate, Rum & Macadamia Slice

I forgot to take a photo of the finished product. This is taken from BHAG video clip.

Saw this on BHAG tv show and thought it looked devilish! I tried making it for A's surprise birthday party yesterday. This relatively easy-to-make slice turned out to be quite a hit at the party!

You may watch the video on how to make this slice here.

Ingredients
Biscuit base:
200g unsalted butter (I used normal butter)
2 cups (300g) plain flour
2 tbsp cocoa powder
1/2 cup (60g) brown sugar
1/3 cup (80g) icing sugar

Middle layer:
1/3 cup (60g) currents (I used sultanas)
1/3 cup (60g) raisins
200ml dark rum
2 tins condensed milk (use those with 98% less sugar if you don't have a sweet tooth)
100ml thickened cream (I used the extra light ones ;))
100g chopped macadamia nuts
70g desiccated coconut
70g dark chocolate

Top layer:
50g butter
200g dark chocolate


1) In a glass mixing bowl, melt unsalted butter. While it is still warm, add cocoa powder, plain flour, brown sugar and icing sugar. Mix well together to form a dough (mine was a bit too wet so I added a bit more plain flour). Spread and lay the dough onto a lightly greased round loose-base flute tin (I used a rectangular brownie tray). Bake it at 190C for 10 mins. Remove from oven to cool.

2) In the meantime, place the currents, raisins and rum into a saucepan. Simmer over high heat. Reduce heat to low and add condensed milk, thickened cream and cocoa powder. Stir well to dissolve cocoa powder and simmer for about 1 min. Add vanilla essence, desiccated coconut and macadamia nuts. Stir everything through and remove from heat.

3) Scatter 70g of dark chocolate chips (or as much or as little as you want) on the baked biscuit. Pour the mixture into the tray. Bake for 15 mins. Remove from oven and allow to cool.

4) For the topping, put dark chocolate and butter into a mixing bowl and melt it over a saucepan of boiling water. Stir to assist melting and ensure that the chocolate is smooth. Spread the chocolate on the cooled slice. Allow it to set. Cut up and serve!


I reckon that the topping (step 4) is optional. Due to time factor, I omitted the topping. But you know what? No one knew and it tasted really good without it! And probably because I used the 1 tin of 98% unsweetened condensed milk, the slice was not too sweet and was just nice enough to eat. I can't imagine how sweet it will be if I were to add 2 tins of sweet condensed milk! Next time I may try just adding 1 tin of less sweetened condensed milk and an additional 100ml of thickened cream. Both chocolate and non-chocolate fans will like this :)

September 22, 2009

Blueberry with White Chocolate Tarts


This recipe is available on the Coles Spring magazine. This is very simple and great-tasting to make for an afternoon tea treat, or dessert to share with your friends. I made this for a lunch gathering at a friend's place over the weekend.


Ingredients (makes 12)
150g blueberries (I used the punnet which I bought fresh and freezed some months ago)
1.5 square sheets of frozen shortcrust pastry, defrosted
150f white chocolate
1/4 cup cream
icing sugar to dust

To make the tart shells, use a 7cm round cutter to cut out 12 circles of pastry. Fit them nicely into muffin baking trays. Cut out 8cm round pieces of baking paper. Place the round discs of baking paper onto each shell. Place some uncooked rice or beans to 'blind bake' them. Bake them at 160C for 10 mins. Remove the rice or beans and continue to bake the tart shells for 5 mins or until slightly golden brown. Leave to cool. Store them in a airtight container if you are not using it immediately. You may make up to 2 days in advance and store them in the container in the fridge.

Melt white chocolate and cream in a glass mixing bowl, placed over a saucepan of water. Make sure the water do not touch the bowl (you only want the steam of the boiling water to heat the bowl above to melt the chocolate). Stir the mixture until it is smooth. Pour in a heat proof jug to pour into the tart shells (or just use a spoon to scoop). Refrigerate the tart shells with chocolate mixture for 1.5 hours. Top it with blueberries and dust icing sugar to serve.

Tip: To defrost blueberries (or any other berries), place the frozen berries in a metal (or any stain-proof) strainer/colander (a wide one, if possible). Allow it to defrost by placing the strainer/colander into a bowl to allow the water from the defrosting process to drip in.


In case you think this is very sweet, it is not. The only sugar comes in the white chocolate (which is not really sweet) and that bit of icing sugar dusted on the tart. The tart and the blueberries are not sweet-tasting. Trust me, you won't stop at eating one! :)

August 4, 2009

Shepherd's Pie & Sticky Date Pudding

We had 2 overseas guests who stayed over at our place for the past 2 nights. In order to welcome them, I thought I will whip up some dinner for us that we enjoy some food and fellowship. (Incidentally, we also acknowledged/celebrated my anniversary of moving to AU exactly 2 years ago!)

Since my guests usually eat asian/chinese food (they live in SG), I figure that I will cook an 'ang moh' western dinner. Decided on a lamb and potato pie, which is very much like shepherd's pie but the recipe uses lamb mince instead of beef mince that I often see in shepherd's pie. I got the recipe off masterchef's website.


However I could not really find lamb mince so I used beef mince instead. And I have also added chopped zucchini and mushrooms with the mince to increase the veggies proportion. It worked out well and there was sufficient to feed all 4 of us (with seconds) and hubby's lunch today.

For dessert, I attempted another masterchef recipe - sticky date pudding with almond praline and butterscotch sauce. This was what 3 of the contestants had to cook during one of their pressure test. It looks easy enough and really it wasn't difficult, except that it was my first time making praline and I had burnt my caramel a bit and hence there was a bitter taste to it. The butterscotch sauce was really easy to make too and you should make it just prior to serving.

Sticky date pudding with butterscotch sauce and (pathetic-looking) almond praline

The pudding was the more tricky bit (but really not too difficult). First, you have to cook the chopped dried dates in some water and then add some bicarb. Somehow that breaks down the dates into a mashed state. Allow that to cool and then add it into the typical cake mixture, after the usual butter and sugar mix, adding eggs and thereafter, adding flour, etc. Place the batter into moulds (I used my muffin trays instead) and bake it in the oven. What I did wrong, was I just placed my muffin trays into the oven as if I was baking muffin cakes. But really, I was supposed to put the tray onto another baking tray filled with some water. I think this might make a difference in the texture.

I kind of overcooked the date cake/pudding, even though it was a shorter time as said (My oven is always acts up, which allows me to bake something in a shorter than required time). Anyhow, the date cake/pudding turned out really good with the butterscotch sauce and a scoop of vanilla ice cream to complete it! It was not too sweet... and for that little effort, the result was greatly satisfying! My usually-do-not-like-desserts-nor-sweets hubby had a 2nd go at it! So for those of you who like sticky date pudding, this is an easy and really rewarding recipe!

Watch the masterchef video of the contestants undergoing the pressure test cooking this dish!


April 23, 2009

Lemon Curd Tartlets

Made this last week for work's morning tea for a special occasion... Was really simple and easy, and best of all, I had all the ingredients at hand in my kitchen!

You can find the recipe here. (I replaced lemon rind on top with lime rind as I ran out of lemon rind after putting them into the cooked custard)

April 13, 2009

Double Chocolate Semifreddo

(photo is not very sharp)

My SIL G tried and made this simple Donna Hay ice cream which I thought I'd try out myself. Really turned out to be very simple and you do not need to freeze the mixture and take it out to beat it and refreeze it again. And you do not require the use of an ice cream maker to make this.

250g chopped dark chocolate
2 tbsp cocoa powder
3 eggs
2 egg yolks
3/4 cup caster sugar (you can add less of this)
1 3/4 cups cream
1 cup finely chopped white chocolate (I used dark chocolate chips)

1) Place chocolate and cocoa in a heatproof bowl over a saucepan of simmering water and stir until smooth. Set aside.

2) Place eggs, yolks, sugar in a heatproof bowl over a saucepan of simmering water and whisk the mixture for 4-5 miutes or until heated though and frothy. Remove from heat and beat with electric mixer for 5-6 mins or until pale and thick. Gently fold through the melted chocolate mixture and set aside.


3) Beat cream in a bowl until very soft peaks form. Gently fold the egg mixture and white chocolate through the cream. Pour it into a metal bowl or cake tin and cover with foil. (I just pour it directly into an old, recycled but clean plastic ice cream container.) Freeze for 4-6 hours or until firm. Makes about 1 litre of ice cream.


This double chocolate ice cream is rich and devilious! You can make other flavours like passionfruit, lemon cream, plum, raspberry, mint. Or create your own flavours if you are up to it :)

January 23, 2009

Pearl / Bubble Tea

Some friends asked how I made the pearls at home to make bubble tea (aka pearl tea). Some of them had failed attempts in making the tapioca pearls.Justify Full They are really easy to make, but I reckon the brand and quality of the pearls may make a difference. This is the one that I bought from Yuen's Grocery for A$2.99 (it was A$2.49 some time in Oct last year)
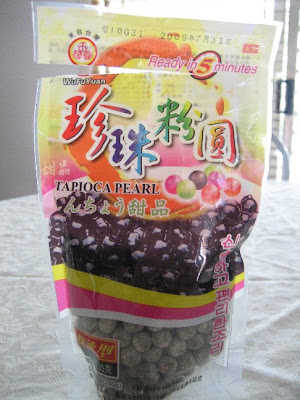


The water has to be really boiling bubbling hot when you put the pearls in, otherwise they may just dissolve into the water. For this brand of pearls, after you throw them in and you see that the pearls fattened up a bit, then turn down to medium heat, allow it to cook for 5 minutes (I let it cooked a couple of minutes longer) and there you go - yummy and chewy pearls!

For best results, after you drain the water away, put some sugared water/syrup with the pearls. This will give the pearls a little sweet taste before you add them into your milk tea later. They taste nicer with a bit of sweetness too. The pearls alone are tasteless and if you add them to the milk tea, it still remains tasteless. To make the sugared water/syrup, just boil some water and put a lavish amount of sugar. Allow it to boil a little. I put in enough sugar when my tastebuds say "yeah this is sweet enough". You can also use this syrup to add into the milk tea. These pearls really have a good chewy texture. Try, where possible, not to leave the pearls in the fridge. They then to stick together more and is a bit harder. If you want to store in the fridge, take them out about 1 hour before so that they won't be that hard. I've not figured out a way to handle it so that they won't stick to each other...

Enjoy, and I hope my friends reading this, will succeed! :)

May 2, 2008

First Trials

I had the opportunity to try out making 2 food stuff recently.

1. Waffles
Excitedly borrowed this waffle maker from a friend. Hubby loves waffles but we figure that it doesn't justify a purchase of the maker. It is also not too cheap to buy frozen ones from the supermarket. So having to borrow the maker for a week really excites me.


I made close to 50 waffles in that one week and gave some to W's parents, grandma and sister. I froze the rest of the lot for future consumption. The pattern on the maker was really pretty - made up of 5 hearts joined together. The batter was really easy to make and about 1/2 cup of batter was put in to make 1 waffle. In 2-3 minutes, we can get a hot crispy waffle!

2. Konnyaku jelly
I love this firm chewy jelly with fruits in them. My mum used to make them for the family and because she makes them, I never have to make this myself.

I ran out of the jelly trays so I used anything that comes to mind

Although the "Redman" brand of konnyaku jelly mix is not readily available in Brisbane, this "Happy Grass" brand served just as well. I found "Redman" brand in one deli shop at Eight Mile Plains but it was expensive and a small packet. At Yuen's Groceries, I could get one of this larger packet which cost just a little more and it makes more than twice the amount that "Redman" could.


I was really happy with the result. The consistency of the jelly was purrrfect! I thought that it might be too watery and less firm... but hey, this was great! Apparently Konnyaku jellies aid digestion and its healthy because there is no fat. But hmm... I think the sugar content is not too low. Well, I suppose everything in moderation is good ey?

December 11, 2006

Mood for Japanese

I have bought these 2 recipe books for a long time. But I have never got down to cooking anything in there. Last weekend, I finally had sufficient will power to ensure that my 'project' gets accomplished.

No one at home cooks Japanese. And so I had to invest in some basi
c Japanese seasonings and common ingredients. Deliberately made a trip (actually 2 eventually. The 2nd trip was unplanned) to Isetan Supermarket, thinking that I can get the authentic Japanese stuff for a good price with my Isetan credit card.

These are the things that I had bought:
1) Konbu
2) Bonito flakes
3) Nori
4) Instant dashi (with konbu and bonito flakes, I can also make dashi from s
cratch)
5) Wasabi
6) Matcha powder
7) Mirin

8) Sake
9) Rice vinegar
10) Shoyu

11) Miso

With the above (and fresh ingredients I bought later), the dinner spread last night consisted of oyako donburi (thanks to Ruth), edamame, beef wit
h leek in sweet sauce and silken tofu with bonito flakes. The dinner ended with matcha ice cream with mochi. It was generally a success :) Next to try: sushi!

Also thanks to CL and R, I learnt how to make the matcha ice cream with mochi dessert. R taught me to mix matcha powder with vanilla ice cream to make my own matcha ice cream. CL taught me to use the frozen sesame dumplings to make mochi - cook them and whilst they are hot, throw them into a bucket of ice water. This will freeze the sesame inside the dumplings. After the dumplings are cold, store them in the fridge until ready to be served. I don't used to like matcha ice cream. But somehow, the taste of sesame mochi and matcha ice cream together has a unique taste that made me love this dessert! Top it off with red bean (azuki bean) paste on the ice cream - perfect! Azuki bean paste is available in a can form in the supermarket.

Matcha ice cream with mochi and azuki bean paste

How "beef with leek in sweet sauce" is supposed to look

That's about it... until my next attempt to cook!

August 4, 2005

Yummy Tiramisu

This recipe was given to me by a friend whom I got to know whilst I was holidaying in Sydney 2003. Sharing this with those who can't resist this yummy Italian dessert. (I have photos for each of the every step below. However I have some problems uploading the photos. If you want the recipe with the photos, let me know :))

These are generally the brands of mascarpone cheese available in our local supermarkets.

They come in either 500g or 250g.

I think the cheapest brand is Locatelli (top right).


There are more than these brands in the market. But I think these are the cheaper ones.


Ingredients: (fits ~25cm by 11cm by 3.5cm tray)
14-16 Fingers Biscuits
250g (9 ou) marscapone cheese
2 eggs
4 tbsp Rhum/Cognac/Baileys/Kahlua (Amount can vary as preferred)
2 tbsp milk
1 cup black coffee
4 tbsp fine sugar
Cocoa powder (to sprinkle)


Note: tbsp = tablespoon


(1) Mix coffee, milk, 2 tbsp sugar & 2 tbsp liquer in a bowl.
(2) Soak the lady fingers in the mixture. Then layer the fingers on a rectangular tray.


(3) Separate egg yolks & egg whites.

(4) Whip egg whites in a large bowl until stiff.

(5) Whip egg yolks and 2 tbsp sugar until white.

(6) Add the marscapone cheese & 2 tbsp liquer. Mix together well.

(7) Fold the whipped egg whites into the marscapone cheese mixture.

(8) Spread the marscapone cheese mixture on the soaked ladyfingers.

(9) With the remaining of the ingredients, repeat method 2 and 8. Be sure the mixture is evenly spread in each layer.

Refrigerate for at least 2 hours before serving.
Just before serving sprinkle the bitter sweet cocoa powder on top generously and evenly.

Related Posts Plugin for WordPress, Blogger...